<?xml version="1.0" encoding="utf-8"?><feed xmlns="http://www.w3.org/2005/Atom" ><generator uri="https://jekyllrb.com/" version="3.10.0">Jekyll</generator><link href="https://powershellstation.com/feed.xml" rel="self" type="application/atom+xml" /><link href="https://powershellstation.com/" rel="alternate" type="text/html" /><updated>2026-05-02T18:02:49+00:00</updated><id>https://powershellstation.com/feed.xml</id><title type="html">PowerShell Station</title><subtitle>Mike&apos;s PowerShell Musings</subtitle><author><name>mike</name></author><entry><title type="html">New WebHost</title><link href="https://powershellstation.com/2021/02/09/new-webhost/" rel="alternate" type="text/html" title="New WebHost" /><published>2021-02-09T19:06:20+00:00</published><updated>2021-02-09T19:06:20+00:00</updated><id>https://powershellstation.com/2021/02/09/new-webhost</id><content type="html" xml:base="https://powershellstation.com/2021/02/09/new-webhost/"><![CDATA[<p>After an emergency at my previous webhost, I've switched to a new webhost.  If you see any missing content, let me know!</p>]]></content><author><name>{&quot;login&quot;=&gt;&quot;mike&quot;, &quot;email&quot;=&gt;&quot;mshepard70@gmail.com&quot;, &quot;display_name&quot;=&gt;&quot;mike&quot;, &quot;first_name&quot;=&gt;&quot;&quot;, &quot;last_name&quot;=&gt;&quot;&quot;}</name><email>mshepard70@gmail.com</email></author><summary type="html"><![CDATA[After an emergency at my previous webhost, I've switched to a new webhost. If you see any missing content, let me know!]]></summary></entry><entry><title type="html">Dude, Where’s my Command?</title><link href="https://powershellstation.com/2020/09/01/dude-wheres-my-command/" rel="alternate" type="text/html" title="Dude, Where’s my Command?" /><published>2020-09-02T00:53:52+00:00</published><updated>2020-09-02T00:53:52+00:00</updated><id>https://powershellstation.com/2020/09/01/dude-wheres-my-command</id><content type="html" xml:base="https://powershellstation.com/2020/09/01/dude-wheres-my-command/"><![CDATA[<h1>The Dilemma</h1>
<p>This post was inspired by a recent occurrence at work.  I have built a framework which constructs documents based on a lists of functions in a module specific to that kind of document.</p>
<p>I found myself running into an issue where even though I knew there was a command named a certain thing, and that the function was correctly exported from the module, PowerShell wasn't finding the command.</p>
<p>My code looked something like this:</p>
<pre class="wp-code language-powershell"><code>
$module=&#39;Module1&#39;

$Steps=&#39;Get-CustomerData&#39;,&#39;Get-MarketingData&#39;,&#39;New-CustomerMarketingDocument&#39;

# each function takes a hashtable as a parameter and outputs a hashtable

$state=@{}

foreach($Step in $Steps){

    $stepCmd=Get-Command -Name $step -module $module

    $state=&amp;amp; $StepCmd -state @State

}
</code></pre>
<p>So why was PowerShell not working nicely for me? The problems has to do with how PowerShell loads functions. Let's take a step back</p>
<h1>PowerShell's Command-Loading Procedure</h1>
<p>For now, let's assume we have a simple script module called Module1.</p>
<p>For a script module to be "discoverable" by PowerShell, it must exist in one of the folders listed in the <strong>PSModulePath</strong> environment variable.</p>
<p>
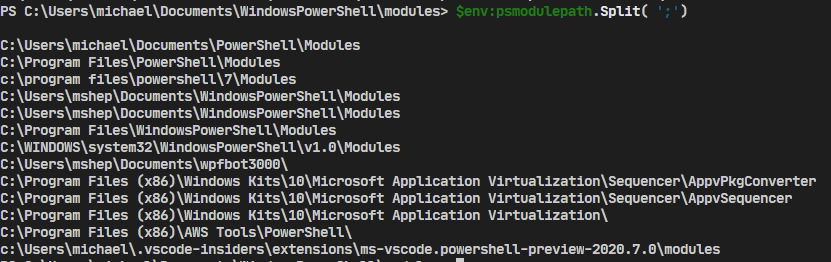
This PowerShell will show you the folders that PowwerShell will look in:</p>
<pre class="wp-code language-powershell"><code>
$env:PSModulePath.Split(&#39;;&#39;)
</code></pre>
<p>Here are the results from a PowerShell 7 instance:<br />
<img class="alignnone wp-image-1446 size-full" src="/assets/2020/09/PSModulePath.png" alt="" width="831" height="262"></p>
<p>When you try to run a command (or use <strong>Get-Command</strong>), PowerShell will first look to see if the command is already loaded. IF so, then it just runs (or outputs) the command you asked for.</p>
<p>If it isn't already present, PowerShell looks through valid modules for the function. As a reminder, valid modules:</p>
<ul>
<li>Exist in one of the folders in <strong>PSModulePath</strong>
</li>
<li>Have a "module file" named the same as the folder it's in (for instance, module1\module1.psm1)</li>
<li>Module Files extensions are psm1, psd1, dll, or cdxml.</li>
<li>File is syntactically valid and not blocked</li>
</ul>
<p>If the command is present, and exported (via <strong>Export-ModuleMember</strong> and <strong>Functions/CmdletsToExport</strong> in the manifest), then the module will be loaded silently and the command (now present) will be executed or output.</p>
<p>Pretty simple, right?</p>
<p>In my case, I had a valid module, in a valid folder, in the <strong>PSModulePath</strong>, with the named function exported from it.  What could have gone wrong?</p>
<h2>PowerShell Command Hiding</h2>
<p>The problem was that I had gotten used to naming functions somewhat generically, and had duplicated one.</p>
<p>I had two modules which contained a function called <strong>Get-DocumentData.  </strong>The command discovery procedure worked fine, it just found the wrong command.</p>
<p>Let's see an example of what I'm talking about.</p>
<p>Consider two modules, module1 and module2.</p>
<p>Module1 has a single command, <strong>Get-Stuff</strong></p>
<pre class="wp-code language-powershell"><code>
function Get-Stuff{

    &#39;in module1&#39;

}
</code></pre>
<p>Similarly, Module2 has a <strong>Get-Stuff</strong> command which outputs 'in module2'.</p>
<p>
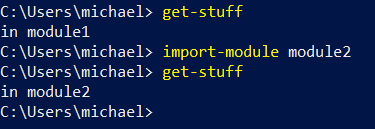
If I were to open a new PowerShell session and type <strong>Get-Stuff</strong>, PowerShell would find module1's copy of Get-Stuff first and load it (that is, module1).</p>
<p>If that were the only<strong> Get-Stuff</strong>, the story would be over.</p>
<p>In this case, I have two different modules with Get-Stuff functions.</p>
<p>To get to the second, I can import the module explicitly:</p>
<pre class="wp-code language-powershell"><code>
Import-Module module2
</code></pre>
<p>You can verify the output below:<br />
<img class="alignnone size-full wp-image-1450" src="/assets/2020/09/twomodules.png" alt="" width="375" height="129"></p>
<p>Now, we've imported both modules and executed both functions. What does Get-Command tell us?<br />
<img class="alignnone size-full wp-image-1451" src="/assets/2020/09/get-command1.png" alt="" width="792" height="113"><br />
First, it only shows us the command from module2, that is, the most recently loaded.</p>
<p>If we ask for the command from module1, we won't find it:<br />
<img class="alignnone size-full wp-image-1452" src="/assets/2020/09/get-command2.png" alt="" width="1048" height="178"></p>
<p>You might notice that the error is misleading.  There sure is a <strong>Get-Stuff</strong> command available, just not from module1 (or at least not available from module1).</p>
<p>But if we ask for "all" Get-Stuff commands, there it is:<br />
<img class="alignnone size-full wp-image-1453" src="/assets/2020/09/get-command3.png" alt="" width="791" height="144"></p>
<p>So, why didn't <strong>Get-Command</strong> show it?</p>
<p>The answer (which you can read in more detail <a href="https://docs.microsoft.com/en-us/powershell/module/microsoft.powershell.core/about/about_command_precedence?view=powershell-5.1" target="_blank" rel="noopener noreferrer">here</a>) is that the module1 version of the command has been hidden, and <strong>Get-Command</strong> (without <strong>-All</strong>) shows commands that aren't hidden.</p>
<p>Adding <strong>-All</strong> to our earlier search for the command works like we had expected:<br />
<img class="alignnone size-full wp-image-1454" src="/assets/2020/09/get-command4.png" alt="" width="789" height="122"></p>
<p>Note that there's another way to get a module-specific command, and that's by using a fully-qualified command reference like <strong>module1\get-stuff</strong>:<br />
<img class="alignnone size-full wp-image-1456" src="/assets/2020/09/fullyqualified.png" alt="" width="355" height="45"></p>
<p>I beat my head against this one for quite a while.  I was even considering writing a blog post about it when I read the about_command_precedence help topic (for research) and figured out the "issue".</p>
<p>Thanks for reading,</p>
<p>Mike</p>]]></content><author><name>{&quot;login&quot;=&gt;&quot;mike&quot;, &quot;email&quot;=&gt;&quot;mshepard70@gmail.com&quot;, &quot;display_name&quot;=&gt;&quot;mike&quot;, &quot;first_name&quot;=&gt;&quot;&quot;, &quot;last_name&quot;=&gt;&quot;&quot;}</name><email>mshepard70@gmail.com</email></author><category term="Scripts" /><summary type="html"><![CDATA[The Dilemma This post was inspired by a recent occurrence at work.  I have built a framework which constructs documents based on a lists of functions in a module specific to that kind of document. I found myself running into an issue where even though I knew there was a command named a certain thing, and that the function was correctly exported from the module, PowerShell wasn't finding the command. My code looked something like this: $module=&#39;Module1&#39;]]></summary></entry><entry><title type="html">Git - The 5 Percent that I Always Use</title><link href="https://powershellstation.com/2020/08/25/git-the-5-percent-that-i-always-use/" rel="alternate" type="text/html" title="Git - The 5 Percent that I Always Use" /><published>2020-08-26T03:29:30+00:00</published><updated>2020-08-26T03:29:30+00:00</updated><id>https://powershellstation.com/2020/08/25/git-the-5-percent-that-i-always-use</id><content type="html" xml:base="https://powershellstation.com/2020/08/25/git-the-5-percent-that-i-always-use/"><![CDATA[<p><img class="size-medium wp-image-1435 alignright" src="/assets/2020/08/320px-Git-logo.svg_-300x126.png" alt="" width="300" height="126">One of the reasons I got into IT was that I really enjoy learning new things. Unfortunately, there are so many things to learn that it's easy to get overwhelmed. Does it make sense to do a deep-dive into each technology that you use, or does it sometimes make sense to skim the cream off the top and move on to the next technology?</p>
<p>In this post, I'm talking about git, the distributed source control system that is used in GitHub, Azure DevOps Repos, GitLab, and countless other places.  Git can be really complicated, and intimidating, so I'm going to try to convey the tiny fragment of git which allows me to get my work done.</p>
<h2>Just Eight Commands</h2>
<p>Here are the commands I regularly use:</p>
<ul>
<li>git clone</li>
<li>git checkout</li>
<li>git add</li>
<li>git commit</li>
<li>git push</li>
<li>git pull</li>
<li>git branch</li>
<li>(occasionally) git stash</li>
</ul>
<p>That's it.  Eight commands.</p>
<p>Here's how I do things.  If you're a git guru and see ways to improve this simple workflow, let me know.  Also, know that I'm usually working on projects by myself, but I try to work like I would on a team.</p>
<h2>Starting Off</h2>
<p>To start, I clone the repository that I'm going to be working on.  For instance, if I wanted to work on WPFBot, I'd go to the github repo for it and get the URL:</p>
<p><!-- wp:image {"id":1426,"sizeSlug":"large"} --></p>
<figure class="wp-block-image size-large"><img class="wp-image-1426" src="/assets/2020/08/image.png" alt=""></figure>
<p><!-- /wp:image --></p>
<p>With that, I can issue the command: </p>
<p><strong>git clone https://github.com/MikeShepard/WPFBot3000</strong></p>
<p>and git will copy the remote repository into a local directory called WPFBot3000 ready for me to edit.</p>
<p>If I'm starting a new project, I would create a repo (Github, AzureDevops, etc.) and clone it locally. </p>
<p>I could create it locally and push it up, but this way I only have one method to remember.</p>
<h2>Preparing for changes</h2>
<p>Before I make any changes, I need to make sure I'm on a branch dedicated to my changes. </p>
<p>If this is a new set of changes I'm working on, I can create the branch and switch to it with the command:</p>
<p><strong>git checkout -b BranchName</strong></p>
<p>(where <em>BranchName</em> is a descriptive label for the changes I'm making.</p>
<p>If the branch already exists,</p>
<p><strong>git checkout BranchName</strong></p>
<p> will switch me to the existing branch.</p>
<h2>Making Changes</h2>
<p>Making changes is easy.  I just make the changes.  I can edit files, move things around, delete files, create folders, etc.</p>
<p>As long as the changes are in the repo (the WPFBot3000 folder, in this case), git will find them. </p>
<p>There are no git commands necessary for this to happen.</p>
<h2>Staging the Changes</h2>
<p>I tell git that I've made changes that I like using the command</p>
<p><strong>git add .</strong></p>
<p>This says to "stage" any changes that I've made anywhere in the repo. </p>
<p>Staging changes isn't "final" in any way.  It just says that these changes are ones I'm interested in.</p>
<p>As before, I could use sophisticated wildcards and parameters to pick what to stage, but by working on short-lived branches I almost always want to stage everything I've changed.</p>
<h2>Committing the Changes</h2>
<p>Committing the changes is like setting a milestone.  This is a point-in-time where the state of these files is "interesting".</p>
<p>I do this using the command: <strong>git commit -m 'A descriptive message about what changes I made'</strong></p>
<p>A few things to note about commits:</p>
<ol>
<li>Interesting doesn't always mean finished. I can commit several times without pushing the code anywhere.</li>
<li>"descriptive" is subjective.  There has been a lot written about good commit messages.  Mine probably are bad.</li>
</ol>
<h2>Repeat the Cycle</h2>
<p>If I'm not done with the changes, I can continue the last 3 steps:</p>
<ul>
<li>Making Changes</li>
<li>Staging the Changes</li>
<li>Committing the Changes</li>
</ul>
<p>All of these steps are happening locally, but by committing often I have chances to roll-back to different places in time if I feel like it (I rarely do).</p>
<h2>Completing the Changes</h2>
<p>The next step is a bit of a cheat.</p>
<p>I hate remembering long git commands, so rather than remembering how to link my local branch with the remote repo, I simply say</p>
<p><strong>git push</strong></p>
<p>Git will reply with an error message because it doesn't know what remote branch to push it to.</p>
<p>In the error message, though, it tells me how to do what I want:</p>
<p><img class="alignnone size-medium wp-image-1433" src="/assets/2020/08/gitpush-1-300x57.png" alt="" width="300" height="57"></p>
<p>In this case, it's </p>
<p><strong>git push --set upstream origin TEst </strong>   (and yes, branch names are case-sensitive)</p>
<h2>Pull Request</h2>
<p>At this point, I go to Azure DevOps or GitHub (I don't use GitLab much) and browse to the repo.</p>
<p>It will usually have a notice that a branch was just changed and will give me the opportunity to create a pull request.</p>
<p>A pull request is a request to merge (or pull) changes from one branch into another.  </p>
<p>Typically, you're merging (or pulling) changes from your branch into master.</p>
<p>Once you've created the pull request, this is the time for your team members to review the changes, make suggestions, and approve or deny the request.</p>
<p>If you're working alone, you can approve the request yourself.</p>
<p>I also select the "delete the branch after merge" option so I don't have a bunch of old branches hanging around.</p>
<p>If the merge is successful, then the changes are now part of the master branch on the remote repo.</p>
<p>They are only in my feature branch locally, though.</p>
<h2>Pulling Changes Down</h2>
<p>To get the updated master branch, I have to first switch to it:</p>
<p><strong>git checkout master<br></strong><br><br>Once I'm on the branch, I can</p>
<p><strong>git pull </strong></p>
<p>to pull the changes down.</p>
<h2>Cleaning up and Starting over</h2>
<p>Now that our changes are in master, I can remove the local branch with:</p>
<p><strong>git branch -d BranchName</strong></p>
<p>At this point, I don't usually know what I'm going to work on next.</p>
<p>I have a bad habit of accidentally making changes in master locally, though so my next step helps me avoid that.</p>
<p>I simply check out a new branch called Next like this:</p>
<p><strong>git checkout -b Next</strong></p>
<p>Note: This is exactly what we did at the beginning, just with a temporary branch name of Next.</p>
<p>When I'm ready to work on a real set of changes, I can rename the branch with</p>
<p> <strong>git branch -m NewBranchName</strong></p>
<h2>Summary</h2>
<p>That probably seemed like a lot, but here are all of the commands (with some obvious placeholders)</p>
<ul>
<li><strong>git clone &lt;url&gt;</strong></li>
<li><strong>git checkout -b BranchName</strong></li>
<li><strong>git add .</strong></li>
<li><strong>git commit -m 'Fantastic commit message'</strong></li>
<li><strong>&lt;repeat add/commit until ready to push&gt;</strong></li>
<li><strong>git push    (followed by copy/paste from the error message)</strong></li>
<li><strong>&lt;proceed to create and complete the pull request&gt;</strong></li>
<li><strong>git checkout master</strong></li>
<li><strong>git pull</strong></li>
<li><strong>git branch -d BranchName</strong></li>
<li><strong>git checkout -b Next</strong></li>
</ul>
<h2>Bonus command - git stash</h2>
<p>If I find I've made changes in master,<strong> git stash</strong> will shelve the changes.  I can then get on the right branch and do a<strong> git stash pop</strong> to get the changes back.</p>
<p>With the adoption of the <strong>git checkout -b Next</strong> protocol, though, I don't find myself needing this very often.</p>
<p>What do you think?  Does this help you get your head around using git?</p>]]></content><author><name>{&quot;login&quot;=&gt;&quot;mike&quot;, &quot;email&quot;=&gt;&quot;mshepard70@gmail.com&quot;, &quot;display_name&quot;=&gt;&quot;mike&quot;, &quot;first_name&quot;=&gt;&quot;&quot;, &quot;last_name&quot;=&gt;&quot;&quot;}</name><email>mshepard70@gmail.com</email></author><category term="Discussion" /><category term="get-learning" /><category term="git" /><category term="git" /><category term="source-control" /><summary type="html"><![CDATA[One of the reasons I got into IT was that I really enjoy learning new things. Unfortunately, there are so many things to learn that it's easy to get overwhelmed. Does it make sense to do a deep-dive into each technology that you use, or does it sometimes make sense to skim the cream off the top and move on to the next technology? In this post, I'm talking about git, the distributed source control system that is used in GitHub, Azure DevOps Repos, GitLab, and countless other places.  Git can be really complicated, and intimidating, so I'm going to try to convey the tiny fragment of git which allows me to get my work done. Just Eight Commands Here are the commands I regularly use: git clone git checkout git add git commit git push git pull git branch (occasionally) git stash That's it.  Eight commands. Here's how I do things.  If you're a git guru and see ways to improve this simple workflow, let me know.  Also, know that I'm usually working on projects by myself, but I try to work like I would on a team. Starting Off To start, I clone the repository that I'm going to be working on.  For instance, if I wanted to work on WPFBot, I'd go to the github repo for it and get the URL: With that, I can issue the command:  git clone https://github.com/MikeShepard/WPFBot3000 and git will copy the remote repository into a local directory called WPFBot3000 ready for me to edit. If I'm starting a new project, I would create a repo (Github, AzureDevops, etc.) and clone it locally.  I could create it locally and push it up, but this way I only have one method to remember. Preparing for changes Before I make any changes, I need to make sure I'm on a branch dedicated to my changes.  If this is a new set of changes I'm working on, I can create the branch and switch to it with the command: git checkout -b BranchName (where BranchName is a descriptive label for the changes I'm making. If the branch already exists, git checkout BranchName  will switch me to the existing branch. Making Changes Making changes is easy.  I just make the changes.  I can edit files, move things around, delete files, create folders, etc. As long as the changes are in the repo (the WPFBot3000 folder, in this case), git will find them.  There are no git commands necessary for this to happen. Staging the Changes I tell git that I've made changes that I like using the command git add . This says to "stage" any changes that I've made anywhere in the repo.  Staging changes isn't "final" in any way.  It just says that these changes are ones I'm interested in. As before, I could use sophisticated wildcards and parameters to pick what to stage, but by working on short-lived branches I almost always want to stage everything I've changed. Committing the Changes Committing the changes is like setting a milestone.  This is a point-in-time where the state of these files is "interesting". I do this using the command: git commit -m 'A descriptive message about what changes I made' A few things to note about commits: Interesting doesn't always mean finished. I can commit several times without pushing the code anywhere. "descriptive" is subjective.  There has been a lot written about good commit messages.  Mine probably are bad. Repeat the Cycle If I'm not done with the changes, I can continue the last 3 steps: Making Changes Staging the Changes Committing the Changes All of these steps are happening locally, but by committing often I have chances to roll-back to different places in time if I feel like it (I rarely do). Completing the Changes The next step is a bit of a cheat. I hate remembering long git commands, so rather than remembering how to link my local branch with the remote repo, I simply say git push Git will reply with an error message because it doesn't know what remote branch to push it to. In the error message, though, it tells me how to do what I want: In this case, it's  git push --set upstream origin TEst    (and yes, branch names are case-sensitive) Pull Request At this point, I go to Azure DevOps or GitHub (I don't use GitLab much) and browse to the repo. It will usually have a notice that a branch was just changed and will give me the opportunity to create a pull request. A pull request is a request to merge (or pull) changes from one branch into another.   Typically, you're merging (or pulling) changes from your branch into master. Once you've created the pull request, this is the time for your team members to review the changes, make suggestions, and approve or deny the request. If you're working alone, you can approve the request yourself. I also select the "delete the branch after merge" option so I don't have a bunch of old branches hanging around. If the merge is successful, then the changes are now part of the master branch on the remote repo. They are only in my feature branch locally, though. Pulling Changes Down To get the updated master branch, I have to first switch to it: git checkout masterOnce I'm on the branch, I can git pull  to pull the changes down. Cleaning up and Starting over Now that our changes are in master, I can remove the local branch with: git branch -d BranchName At this point, I don't usually know what I'm going to work on next. I have a bad habit of accidentally making changes in master locally, though so my next step helps me avoid that. I simply check out a new branch called Next like this: git checkout -b Next Note: This is exactly what we did at the beginning, just with a temporary branch name of Next. When I'm ready to work on a real set of changes, I can rename the branch with  git branch -m NewBranchName Summary That probably seemed like a lot, but here are all of the commands (with some obvious placeholders) git clone &lt;url&gt; git checkout -b BranchName git add . git commit -m 'Fantastic commit message' &lt;repeat add/commit until ready to push&gt; git push    (followed by copy/paste from the error message) &lt;proceed to create and complete the pull request&gt; git checkout master git pull git branch -d BranchName git checkout -b Next Bonus command - git stash If I find I've made changes in master, git stash will shelve the changes.  I can then get on the right branch and do a git stash pop to get the changes back. With the adoption of the git checkout -b Next protocol, though, I don't find myself needing this very often. What do you think?  Does this help you get your head around using git?]]></summary></entry><entry><title type="html">Very Verbose PowerShell Output</title><link href="https://powershellstation.com/2020/08/21/very-verbose-powershell-output/" rel="alternate" type="text/html" title="Very Verbose PowerShell Output" /><published>2020-08-21T11:50:46+00:00</published><updated>2020-08-21T11:50:46+00:00</updated><id>https://powershellstation.com/2020/08/21/very-verbose-powershell-output</id><content type="html" xml:base="https://powershellstation.com/2020/08/21/very-verbose-powershell-output/"><![CDATA[<p>Have you ever been writing a PowerShell script and wanted verbose output to show up no matter what?</p>
<p>You may have thought of doing something like this:<br />
<pre class="wp-code language-powershell"><code>
#Save the preference variable so you can put it back later

$saveVerbosePreference=$VerbosePreference
#Override the preference variable to make the output show up

$VerbosePreference=&#39;Continue&#39;

Write-Verbose &#39;This is an important message you need to see&#39;
#Leave it like you found it

$VerbosePreference=$saveVerbosePreference
</code></pre> </p>
<p>If you do that, you'll get the verbose message every time, just like you wanted.</p>
<p>Fortunately for you, there's a much easier way to get the message:<br />
<pre class="wp-code language-powershell"><code>
#By adding the -Verbose switch, you override the preference for this cmdlet

Write-Verbose &#39;This is an important message you need to see&#39; -Verbose
</code></pre>
<p>Wasn't that easy?</p>]]></content><author><name>{&quot;login&quot;=&gt;&quot;mike&quot;, &quot;email&quot;=&gt;&quot;mshepard70@gmail.com&quot;, &quot;display_name&quot;=&gt;&quot;mike&quot;, &quot;first_name&quot;=&gt;&quot;&quot;, &quot;last_name&quot;=&gt;&quot;&quot;}</name><email>mshepard70@gmail.com</email></author><category term="Scripts" /><summary type="html"><![CDATA[Have you ever been writing a PowerShell script and wanted verbose output to show up no matter what? You may have thought of doing something like this: #Save the preference variable so you can put it back later]]></summary></entry><entry><title type="html">A PowerShell Parameter Puzzler</title><link href="https://powershellstation.com/2019/01/02/a-powershell-parameter-puzzler/" rel="alternate" type="text/html" title="A PowerShell Parameter Puzzler" /><published>2019-01-03T03:33:07+00:00</published><updated>2019-01-03T03:33:07+00:00</updated><id>https://powershellstation.com/2019/01/02/a-powershell-parameter-puzzler</id><content type="html" xml:base="https://powershellstation.com/2019/01/02/a-powershell-parameter-puzzler/"><![CDATA[<img class="size-medium wp-image-1400 alignright" style="font-family: Consolas, Monaco, monospace;" src="/assets/2019/01/puzzle-308908_640-300x280.png" alt="" width="300" height="280"><br />
I ran across an interesting PowerShell behavior today thanks to a coworker (hi Matt!).</p>
<p>It involved a function with just a few arguments. When I looked at the syntax something looked off.</p>
<p>I am not going to recreate the exact scenario I found (because it involved a cmdlet written in C#), but I was able to recreate a similar issue using advanced functions.</p>
<p>So consider that you are entering a command and you see an intellisense prompt like this one:<br />
<img class="size-medium wp-image-1397 alignnone" src="/assets/2019/01/intellisense-300x251.png" alt="" width="300" height="251"></p>
<p>You would rightfully assume that it had 3 parameters.</p>
<p>If you looked at the syntax using Get-Help (or the -? switch) you would see something strange:</p>
<p><img class="size-medium wp-image-1398 alignnone" src="/assets/2019/01/question_syntax-300x75.png" alt="" width="300" height="75"></p>
<p>Wait...where did the other 2 parameters go?</p>
<p>Using Get-Command get-Thing -syntax shows essentially the same result:</p>
<p><img class="alignnone size-medium wp-image-1399" src="/assets/2019/01/get-command_syntax-300x36.png" alt="" width="300" height="36"></p>
<p>This was the kind of problem I ran into.  I was given a cmdlet, and when I looked at the syntax to see the parameters, I didn't find the parameters I expected.  They were there, but they weren't shown by Get-Command.</p>
<p>The "puzzle" is a bit less confusing when you see the code of the function:</p>
<pre class="wp-code language-powershell"><code>
function get-thing {

[CmdletBinding()]

Param(

  [Parameter(Position=0)]$parm1,

  [Parameter(Position=0)]$parm2,

  [Parameter(Position=0)]$parm3

)
#nothing to see here
}
</code></pre>
<p>The issue arose from the overlapping position modifiers on the parameters. When those are corrected the issue goes away.</p>
<p>Note: The original instance was a bit stranger. As I mentioned earlier, the cmdlet in question was written in C#. What really surprised me was that Get-Help and Get-Command showed different syntaxes. Get-Help showed all of the parameters, while Get-Command only showed the last one.</p>]]></content><author><name>{&quot;login&quot;=&gt;&quot;mike&quot;, &quot;email&quot;=&gt;&quot;mshepard70@gmail.com&quot;, &quot;display_name&quot;=&gt;&quot;mike&quot;, &quot;first_name&quot;=&gt;&quot;&quot;, &quot;last_name&quot;=&gt;&quot;&quot;}</name><email>mshepard70@gmail.com</email></author><category term="Parameters" /><category term="Scripts" /><category term="parameter" /><category term="puzzle" /><category term="syntax" /><summary type="html"><![CDATA[I ran across an interesting PowerShell behavior today thanks to a coworker (hi Matt!). It involved a function with just a few arguments. When I looked at the syntax something looked off. I am not going to recreate the exact scenario I found (because it involved a cmdlet written in C#), but I was able to recreate a similar issue using advanced functions. So consider that you are entering a command and you see an intellisense prompt like this one: You would rightfully assume that it had 3 parameters. If you looked at the syntax using Get-Help (or the -? switch) you would see something strange: Wait...where did the other 2 parameters go? Using Get-Command get-Thing -syntax shows essentially the same result: This was the kind of problem I ran into.  I was given a cmdlet, and when I looked at the syntax to see the parameters, I didn't find the parameters I expected.  They were there, but they weren't shown by Get-Command. The "puzzle" is a bit less confusing when you see the code of the function: function get-thing {]]></summary></entry><entry><title type="html">The PowerShell Conference Book</title><link href="https://powershellstation.com/2018/08/04/the-powershell-conference-book/" rel="alternate" type="text/html" title="The PowerShell Conference Book" /><published>2018-08-04T17:53:58+00:00</published><updated>2018-08-04T17:53:58+00:00</updated><id>https://powershellstation.com/2018/08/04/the-powershell-conference-book</id><content type="html" xml:base="https://powershellstation.com/2018/08/04/the-powershell-conference-book/"><![CDATA[<img src="/assets/2018/08/psconftitle-1-232x300.jpg" alt="" width="232" height="300" class="alignright size-medium wp-image-1390"></p>
<p>Back in May, Mike Robbins (@mikefrobbins) asked if I wanted to contribute a chapter to a book he was putting together. The book would include chapters from different scripters in the PowerShell community and each would provide material that would be similar to a session at a conference.<br>In addition, the proceeds from the sale of the book would support the DevOpsCollective OnRamp scholarship for new IT pros going to the PowerShell and DevOps Conference in 2019.</p>
<p>Sounded like fun, so I signed on. We did the writing in markdown in a private GitHub repo. Not at all what I'm used to for writing but it was a really good experience. Mike was joined by Mike Lombardi (@barbariankb, from the STLPSUG) and Jeff Hicks (@jeffhicks). They did a great job corralling over 30 writers and at this point, the book is at 90% complete.</p>
<p>If you haven't heard about this, go over to <a href="https://leanpub.com/powershell-conference-book">leanpub</a> and take a look. The table of contents alone should convince you that this book is worth your time.<br>My chapter, Rethinking PowerShell GUIs, went live last friday (8/3) and talks about the beginnings of WPFBot3000 and a "companion" module called ContextSensitiveMenus which I haven't blogged about yet.</p>
<p>I would enjoy hearing feedback on my chapter and the book in general.</p>
<p>--Mike</p>]]></content><author><name>{&quot;login&quot;=&gt;&quot;mike&quot;, &quot;email&quot;=&gt;&quot;mshepard70@gmail.com&quot;, &quot;display_name&quot;=&gt;&quot;mike&quot;, &quot;first_name&quot;=&gt;&quot;&quot;, &quot;last_name&quot;=&gt;&quot;&quot;}</name><email>mshepard70@gmail.com</email></author><category term="Announcement" /><category term="Books" /><category term="Scripts" /><category term="WPF" /><category term="PSConfBook" /><category term="WPFBot3000" /><summary type="html"><![CDATA[Back in May, Mike Robbins (@mikefrobbins) asked if I wanted to contribute a chapter to a book he was putting together. The book would include chapters from different scripters in the PowerShell community and each would provide material that would be similar to a session at a conference.In addition, the proceeds from the sale of the book would support the DevOpsCollective OnRamp scholarship for new IT pros going to the PowerShell and DevOps Conference in 2019. Sounded like fun, so I signed on. We did the writing in markdown in a private GitHub repo. Not at all what I'm used to for writing but it was a really good experience. Mike was joined by Mike Lombardi (@barbariankb, from the STLPSUG) and Jeff Hicks (@jeffhicks). They did a great job corralling over 30 writers and at this point, the book is at 90% complete. If you haven't heard about this, go over to leanpub and take a look. The table of contents alone should convince you that this book is worth your time.My chapter, Rethinking PowerShell GUIs, went live last friday (8/3) and talks about the beginnings of WPFBot3000 and a "companion" module called ContextSensitiveMenus which I haven't blogged about yet. I would enjoy hearing feedback on my chapter and the book in general. --Mike]]></summary></entry><entry><title type="html">PowerShell DSL Module Considerations</title><link href="https://powershellstation.com/2018/08/01/powershell-dsl-module-considerations/" rel="alternate" type="text/html" title="PowerShell DSL Module Considerations" /><published>2018-08-02T02:29:57+00:00</published><updated>2018-08-02T02:29:57+00:00</updated><id>https://powershellstation.com/2018/08/01/powershell-dsl-module-considerations</id><content type="html" xml:base="https://powershellstation.com/2018/08/01/powershell-dsl-module-considerations/"><![CDATA[<p>Just a quick note to mention a couple of things I've come across with PowerShell modules that encapsulate DSLs (Domain Specific Languages, specifically WPFBot3000).</p>
<h2>PowerShell Command Name Warnings</h2>
<p>PowerShell modules have always issued warnings if they contain commands that don't use approved verbs.  What's fun with modules for DSLs is that the commands in general don't use verbs at all.  Since these commands aren't "proper", you might expect a warning.  You won't get one, though.</p>
<h2>PowerShell Module Autoloading</h2>
<p>PowerShell modules have had autoloading since v3.0.  Simply put, if you use a cmdlet that isn't present in your session PowerShell will look in all of the modules in the <strong>PSModulePath</strong> and try to find the cmdlet somewhere.  If it finds it, PowerShell imports the module quietly behind the scenes.</p>
<p>This doesn't work out of the box with DSLs.  The reason is simple.</p>
<p>DSLs generally have commands that aren't in the verb-noun form that PowerShell is expecting for a cmdlet, so it doesn't try to look for the command at all.</p>
<p>The fix for this is simple (for WPFBot3000, at least).  All I've done is replace the two top-level commands (<strong>Window</strong> and <strong>Dialog</strong>) with well-formed cmdlet names (<strong>New-WPFBotWindow</strong> and <strong>Invoke-WPFBotDialog</strong>).  Then, I create aliases (<strong>Window</strong> and <strong>Dialog</strong>) pointing to these commands.</p>
<p>Now that I think of it, I'm not sure why that works.  If PowerShell is looking for the aliases, why wasn't it finding the commands?  Nevertheless, it works.</p>
<p>That's all for today, just a couple of oddities.</p>
<p>--Mike</p>]]></content><author><name>{&quot;login&quot;=&gt;&quot;mike&quot;, &quot;email&quot;=&gt;&quot;mshepard70@gmail.com&quot;, &quot;display_name&quot;=&gt;&quot;mike&quot;, &quot;first_name&quot;=&gt;&quot;&quot;, &quot;last_name&quot;=&gt;&quot;&quot;}</name><email>mshepard70@gmail.com</email></author><category term="Scripts" /><summary type="html"><![CDATA[Just a quick note to mention a couple of things I've come across with PowerShell modules that encapsulate DSLs (Domain Specific Languages, specifically WPFBot3000). PowerShell Command Name Warnings PowerShell modules have always issued warnings if they contain commands that don't use approved verbs.  What's fun with modules for DSLs is that the commands in general don't use verbs at all.  Since these commands aren't "proper", you might expect a warning.  You won't get one, though. PowerShell Module Autoloading PowerShell modules have had autoloading since v3.0.  Simply put, if you use a cmdlet that isn't present in your session PowerShell will look in all of the modules in the PSModulePath and try to find the cmdlet somewhere.  If it finds it, PowerShell imports the module quietly behind the scenes. This doesn't work out of the box with DSLs.  The reason is simple. DSLs generally have commands that aren't in the verb-noun form that PowerShell is expecting for a cmdlet, so it doesn't try to look for the command at all. The fix for this is simple (for WPFBot3000, at least).  All I've done is replace the two top-level commands (Window and Dialog) with well-formed cmdlet names (New-WPFBotWindow and Invoke-WPFBotDialog).  Then, I create aliases (Window and Dialog) pointing to these commands. Now that I think of it, I'm not sure why that works.  If PowerShell is looking for the aliases, why wasn't it finding the commands?  Nevertheless, it works. That's all for today, just a couple of oddities. --Mike]]></summary></entry><entry><title type="html">WPFBot3000 - Approaching 1.0</title><link href="https://powershellstation.com/2018/07/31/wpfbot3000-approaching-1-0/" rel="alternate" type="text/html" title="WPFBot3000 - Approaching 1.0" /><published>2018-08-01T04:23:39+00:00</published><updated>2018-08-01T04:23:39+00:00</updated><id>https://powershellstation.com/2018/07/31/wpfbot3000-approaching-1-0</id><content type="html" xml:base="https://powershellstation.com/2018/07/31/wpfbot3000-approaching-1-0/"><![CDATA[<p>I just pushed version 0.9.18 of WPFBot3000 to the PowerShell Gallery and would love to get feedback. I've been poking and prodding, refactoring and shuffling for the last month or so.</p>
<p>In that time I've added the following:</p>
<ul>
<li>Attached Properties (like Grid.Row or Dockpanel.Top)</li>
<li>DockPanels</li>
<li>A separate "DataEntryGrid" to help with complex layout</li>
<li>A ton of other controls (DataGrid and ListView are examples)</li>
<li>A really exciting BYOC (bring your own controls) set of functions</li>
</ul>
<p>Mostly, though, I've tried to focus on one thing: reducing the code needed to build a UI.</p>
<p>To that end, here are a few more additions:</p>
<ul>
<li>Variables for all named controls (no more need to GetControlByName()</li>
<li>-ShowForValue switch on Window which makes it work similarly to Dialog</li>
</ul>
<p>In case you haven't looked at this before, here's the easy demo:</p>
<pre class="wp-code language-powershell"><code>
$output=Dialog {

    TextBox FirstName

    TextBox LastName

    Calendar Birthdate

}

&#39;{0} {1} was born on {2}&#39; -f $output.FirstName,$output.LastName,$output.Birthdate
</code></pre>
<p><img class="alignnone wp-image-1368 size-full" src="/assets/2018/07/wpfbot3000-dataentry.png" alt="" width="256" height="282"></p>
<p><img class="alignnone wp-image-1369 size-full" src="/assets/2018/07/wpfbot3000-dataentry-output.png" alt="" width="608" height="102"></p>
<p>There are tons of features to talk about, and I'll be following up with a series of posts illustrating them.</p>
<p>In the meantime, use <strong>Install-Module WPFBot3000</strong> (or <strong>Update-Module WPFBot3000</strong>) and let me know what you think.</p>
<p>Are there things that are missing?</p>
<p>Are there things that are broken?</p>
<p>Is something difficult to do that shouldn't be?</p>
<p>Feel free to enter issues in the <a href="https://github.com/MikeShepard/WPFBot3000">github repo</a> or let me know through twitter, email, Reddit, etc.</p>
<p>-Mike</p>]]></content><author><name>{&quot;login&quot;=&gt;&quot;mike&quot;, &quot;email&quot;=&gt;&quot;mshepard70@gmail.com&quot;, &quot;display_name&quot;=&gt;&quot;mike&quot;, &quot;first_name&quot;=&gt;&quot;&quot;, &quot;last_name&quot;=&gt;&quot;&quot;}</name><email>mshepard70@gmail.com</email></author><category term="Announcement" /><category term="WPF" /><category term="WPFBot3000" /><summary type="html"><![CDATA[I just pushed version 0.9.18 of WPFBot3000 to the PowerShell Gallery and would love to get feedback. I've been poking and prodding, refactoring and shuffling for the last month or so. In that time I've added the following: Attached Properties (like Grid.Row or Dockpanel.Top) DockPanels A separate "DataEntryGrid" to help with complex layout A ton of other controls (DataGrid and ListView are examples) A really exciting BYOC (bring your own controls) set of functions Mostly, though, I've tried to focus on one thing: reducing the code needed to build a UI. To that end, here are a few more additions: Variables for all named controls (no more need to GetControlByName() -ShowForValue switch on Window which makes it work similarly to Dialog In case you haven't looked at this before, here's the easy demo: $output=Dialog {]]></summary></entry><entry><title type="html">Introducing WPFBot3000</title><link href="https://powershellstation.com/2018/07/05/introducing-wpfbot3000/" rel="alternate" type="text/html" title="Introducing WPFBot3000" /><published>2018-07-06T03:00:05+00:00</published><updated>2018-07-06T03:00:05+00:00</updated><id>https://powershellstation.com/2018/07/05/introducing-wpfbot3000</id><content type="html" xml:base="https://powershellstation.com/2018/07/05/introducing-wpfbot3000/"><![CDATA[<h2>Preamble</h2>
<p>After 2 "intro" posts about writing a DSL for WPF, I decided to just bit the bullet and publish the project. It has been bubbling around in my head (and in github) for over 6 months and rather than give it out in installments I decided that I would rather just have it in front of a bunch of people. You can find WPFBot3000 <a href="https://github.com/MikeShepard/WPFBot3000/">here</a>.</p>
<p><img class="size-thumbnail wp-image-1359 alignright" src="/assets/2018/07/survey-2316468_640-150x150.png" alt="" width="150" height="150"></p>
<h2>Before the code, a few remarks</h2>
<p>A few things I need to say before I get to showing example code. First, naming is hard. The repo for this has been called "WPF_DSL" until about 2 hours ago. I decided on the way home from work that it needed a better name. Since it was similar in form to my other DSL project (VisioBot3000), the name should have been obvious to me a long time ago.</p>
<p>Second, the main reasons I wrote this are:</p>
<ul>
<li>As an example of a DSL in PowerShell</li>
<li>To allow for easier creation of WPF windows</li>
<li>Because I'm really not that good at WPF</li>
</ul>
<p>In light of that last point, if you're looking at the code in the repo and you see something particularly horrible, please enter an issue (or even better a pull request with a fix). As far as the first two go, you can be the judge after you've seen some examples.</p>
<h2>Installing WPFBot3000</h2>
<p>WPFBot3000 can be found in the <a href="https://www.powershellgallery.com/">PowerShell Gallery</a>, so if you want to install it for all users you can do this:</p>
<pre class="wp-code language-powershell"><code>
#in an elevated session

Install-Module WPFBot3000
</code></pre>
<p>Or, if you want to install it for the current user only, do this:</p>
<pre class="wp-code language-powershell"><code>
Install-Module WPFBot3000 -Scope CurrentUser
</code></pre>
<p>If you'd rather, you can clone the repo from github (it has examples and tests) and install it from the WPFBot3000 subfolder.</p>
<h2>A first example</h2>
<p>Here's a pretty simple example that should look familiar if you read the previous posts.</p>
<pre class="wp-code language-powershell"><code>
Import-Module WPFBot3000

Dialog {

   TextBox FirstName

   TextBox LastName

   TextBox EmailAddress

   DatePicker ReminderDate

}
</code></pre>
<p>Running that shows a window like this (the gridlines are for debugging layout and they will be going away/configurable in an upcoming release):</p>
<p><img class="alignnone wp-image-1351 size-full" src="/assets/2018/07/WPFBot3000_dataEntry.png" alt="" width="498" height="211"></p>
<p>Comparing the code to the examples in the previous posts you'll notice the main command is now <strong>Dialog</strong> rather than <strong>Window</strong>.  There is still a <strong>Window</strong> command, but it just outputs the window object.  The <strong>Dialog</strong> command uses <strong>Window</strong> to build the object (after adding an OK and Cancel Button) and then calls ShowDialog() on it.  If the user presses OK, <strong>Dialog</strong> builds an object representing the controls in the window and outputs that object.  The output object has properties that match the names of the controls* in the window:</p>
<p><img class="size-medium wp-image-1352 alignnone" src="/assets/2018/07/WPFBot3000_dataEntryResult-300x102.png" alt="" width="300" height="102"></p>
<p>* Only named controls that know how to return a value</p>
<p>You'll also notice that <strong>DatePicker</strong> has been implemented in addition to <strong>TextBox</strong>.</p>
<p>The current list of controls that have been implemented is as follows:</p>
<ul>
<li>Button</li>
<li>CheckBox</li>
<li>ComboBox</li>
<li>CredentialPicker</li>
<li>DatePicker</li>
<li>DirectoryPicker</li>
<li>FilePicker</li>
<li>Grid</li>
<li>GridSplitter</li>
<li>Image</li>
<li>Label</li>
<li>ListBox</li>
<li>MutliLineTextBox</li>
<li>Password</li>
<li>StackPanel</li>
<li>TabControl</li>
<li>TabItem</li>
<li>TextBlock</li>
<li>TextBox</li>
<li>TreeView</li>
</ul>
<h2>Other Features</h2>
<p>I'm not going to go into every feature present (more posts to come), but here are some teasers:</p>
<ul>
<li>Context Menus</li>
</ul>
<p><img class="alignnone size-full wp-image-1354" src="/assets/2018/07/WPFBot3000_contextMenu.png" alt="" width="566" height="177"></p>
<ul>
<li>Event Handlers</li>
</ul>
<p><img class="alignnone size-full wp-image-1355" src="/assets/2018/07/WPFBot3000_event.png" alt="" width="494" height="248"></p>
<ul>
<li>Changing Properties (but not attached or derived properties yet)</li>
</ul>
<p><img class="alignnone size-full wp-image-1357" src="/assets/2018/07/WPF3000_properties.png" alt="" width="567" height="73"></p>
<p>That's enough for tonight, but I'll be posting more in the days and weeks to come.</p>
<p>Let me know what you think. Feel free to post</p>]]></content><author><name>{&quot;login&quot;=&gt;&quot;mike&quot;, &quot;email&quot;=&gt;&quot;mshepard70@gmail.com&quot;, &quot;display_name&quot;=&gt;&quot;mike&quot;, &quot;first_name&quot;=&gt;&quot;&quot;, &quot;last_name&quot;=&gt;&quot;&quot;}</name><email>mshepard70@gmail.com</email></author><category term="Scripts" /><category term="WPF" /><category term="WPFBot3000" /><summary type="html"><![CDATA[Preamble After 2 "intro" posts about writing a DSL for WPF, I decided to just bit the bullet and publish the project. It has been bubbling around in my head (and in github) for over 6 months and rather than give it out in installments I decided that I would rather just have it in front of a bunch of people. You can find WPFBot3000 here. Before the code, a few remarks A few things I need to say before I get to showing example code. First, naming is hard. The repo for this has been called "WPF_DSL" until about 2 hours ago. I decided on the way home from work that it needed a better name. Since it was similar in form to my other DSL project (VisioBot3000), the name should have been obvious to me a long time ago. Second, the main reasons I wrote this are: As an example of a DSL in PowerShell To allow for easier creation of WPF windows Because I'm really not that good at WPF In light of that last point, if you're looking at the code in the repo and you see something particularly horrible, please enter an issue (or even better a pull request with a fix). As far as the first two go, you can be the judge after you've seen some examples. Installing WPFBot3000 WPFBot3000 can be found in the PowerShell Gallery, so if you want to install it for all users you can do this: #in an elevated session]]></summary></entry><entry><title type="html">A PowerShell WPF DSL (Part 2) - Getting Control Values</title><link href="https://powershellstation.com/2018/06/29/a-powershell-wpf-dsl-part-2-getting-control-values/" rel="alternate" type="text/html" title="A PowerShell WPF DSL (Part 2) - Getting Control Values" /><published>2018-06-30T03:10:45+00:00</published><updated>2018-06-30T03:10:45+00:00</updated><id>https://powershellstation.com/2018/06/29/a-powershell-wpf-dsl-part-2-getting-control-values</id><content type="html" xml:base="https://powershellstation.com/2018/06/29/a-powershell-wpf-dsl-part-2-getting-control-values/"><![CDATA[<h2>Some Background</h2>
<p>Before I start, I should probably take a minute to explain what a DSL is and why you would want to use one.</p>
<p>A <strong>DSL</strong> (domain-specific language) is a (usually small) language where the vocabulary comes from a specific problem domain (or subject).  Note that this has nothing to do with Active Directory domains, so that might have been confusing.</p>
<p>By using words that are naturally used in describing problems in this subject, it is possible to write using the DSL in ways that look less like programming and more like describing the solution.</p>
<p>For instance, in Pester, you might write part of a unit test like this (3.0 syntax):</p>
<pre class="wp-code language-powershell"><code>
It &quot;Has a non-negative result&quot; {

   $result | Should Be GreaterThan 0

}
</code></pre>
<p>There are some aspects of this that look like PowerShell (the $, the | and the {}), but in general it doesn't look much like code. It looks more like a description of the test that we're writing.</p>
<p>In the WPF DSL that I'm describing in these posts, I want to be able to write PowerShell scripts that create WPF applications in a way that the "WPF" part of the script is easy. At least, a lot easier than trying to generate XAML or automate the WPF classes using brute force. That being said, the code in my DSL is not some sort of magic, it's just PowerShell code.</p>
<p>One interesting aspect of DSLs is that because they don't look quite like code, they often ignore coding conventions. Note that the Pester example had a PowerShell cmdlet called "It". No verb-noun convention followed there. Also, Using positional parameters is more common in a DSL. Not a problem, just something to be aware of.</p>
<h2>Getting Control Values</h2>
<p>One of the problems I listed at the end of the <a href="https://powershellstation.com/2018/06/28/starting-a-powershell-dsl-for-wpf-apps/">previous post</a> (#3) was that reading the text property won't work once we have other controls to think about besides textboxes.</p>
<p>My solution here has worked out really well. I decided to add a method to any control that I would want to get a value from. The method is called GetControlValue. It is responsible for knowing how to get the values from the control (which, as part of the control object it will have no problem with).</p>
<p>Here's the updated <strong>Textbox</strong> function:</p>
<pre class="wp-code language-powershell"><code>
function TextBox {

    [CmdletBinding()]

    Param($Name)

    $Properties = @{ Name = $name ;MinWidth=100}

    New-Object System.Windows.Controls.TextBox -Property $properties |

        Add-Member -Name GetControlValue -MemberType ScriptMethod -Value {$this.Text} -PassThru

}
</code></pre>
<p>Since it's a ScriptMethod, we get to use <strong>$this</strong> to refer to the control, so <strong>$this.Text</strong> is the value we want.</p>
<p>With that in place, we need to update the If statement at the end of the Window function to use the ScriptMethod. Here's what it looks like:</p>
<pre class="wp-code language-powershell"><code>
if($window.ShowDialog() -or $true){

if($window.ShowDialog() -or $true){

  $output=[Ordered]@{}

  foreach($item in $controls){

    $output[$item.Name]=$item.GetControlValue()

  }

  [PSCustomObject]$output

}
</code></pre>
<h2>Conclusion</h2>
<p>Here's the checklist now:</p>
<ol>
<li>Only textboxes? Need several other controls</li>
<li>OK/Cancel</li>
<li><del datetime="2018-06-30T03:08:35+00:00">With other controls, reading the text property won’t be a strategy</del></li>
<li>Nested controls</li>
<li>Populating controls</li>
<li>Events</li>
<li>ContextMenus</li>
<li>Setting control properties</li>
</ol>
<p>Stay tuned for more...</p>
<p>--Mike</p>]]></content><author><name>{&quot;login&quot;=&gt;&quot;mike&quot;, &quot;email&quot;=&gt;&quot;mshepard70@gmail.com&quot;, &quot;display_name&quot;=&gt;&quot;mike&quot;, &quot;first_name&quot;=&gt;&quot;&quot;, &quot;last_name&quot;=&gt;&quot;&quot;}</name><email>mshepard70@gmail.com</email></author><category term="Scripts" /><summary type="html"><![CDATA[Some Background Before I start, I should probably take a minute to explain what a DSL is and why you would want to use one. A DSL (domain-specific language) is a (usually small) language where the vocabulary comes from a specific problem domain (or subject).  Note that this has nothing to do with Active Directory domains, so that might have been confusing. By using words that are naturally used in describing problems in this subject, it is possible to write using the DSL in ways that look less like programming and more like describing the solution. For instance, in Pester, you might write part of a unit test like this (3.0 syntax): It &quot;Has a non-negative result&quot; {]]></summary></entry></feed>