Preamble
After 2 “intro” posts about writing a DSL for WPF, I decided to just bit the bullet and publish the project. It has been bubbling around in my head (and in github) for over 6 months and rather than give it out in installments I decided that I would rather just have it in front of a bunch of people. You can find WPFBot3000 here.

Before the code, a few remarks
A few things I need to say before I get to showing example code. First, naming is hard. The repo for this has been called “WPF_DSL” until about 2 hours ago. I decided on the way home from work that it needed a better name. Since it was similar in form to my other DSL project (VisioBot3000), the name should have been obvious to me a long time ago.
Second, the main reasons I wrote this are:
- As an example of a DSL in PowerShell
- To allow for easier creation of WPF windows
- Because I’m really not that good at WPF
In light of that last point, if you’re looking at the code in the repo and you see something particularly horrible, please enter an issue (or even better a pull request with a fix). As far as the first two go, you can be the judge after you’ve seen some examples.
Installing WPFBot3000
WPFBot3000 can be found in the PowerShell Gallery, so if you want to install it for all users you can do this:
#in an elevated session
Install-Module WPFBot3000
Or, if you want to install it for the current user only, do this:
Install-Module WPFBot3000 -Scope CurrentUser
If you’d rather, you can clone the repo from github (it has examples and tests) and install it from the WPFBot3000 subfolder.
A first example
Here’s a pretty simple example that should look familiar if you read the previous posts.
Import-Module WPFBot3000
Dialog {
   TextBox FirstName
   TextBox LastName
   TextBox EmailAddress
   DatePicker ReminderDate
}
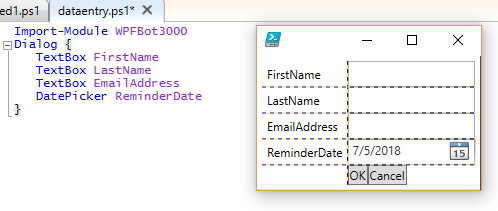
Running that shows a window like this (the gridlines are for debugging layout and they will be going away/configurable in an upcoming release):

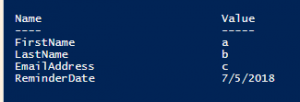
Comparing the code to the examples in the previous posts you’ll notice the main command is now Dialog rather than Window. There is still a Window command, but it just outputs the window object. The Dialog command uses Window to build the object (after adding an OK and Cancel Button) and then calls ShowDialog() on it. If the user presses OK, Dialog builds an object representing the controls in the window and outputs that object. The output object has properties that match the names of the controls* in the window:

* Only named controls that know how to return a value
You’ll also notice that DatePicker has been implemented in addition to TextBox.
The current list of controls that have been implemented is as follows:
- Button
- CheckBox
- ComboBox
- CredentialPicker
- DatePicker
- DirectoryPicker
- FilePicker
- Grid
- GridSplitter
- Image
- Label
- ListBox
- MutliLineTextBox
- Password
- StackPanel
- TabControl
- TabItem
- TextBlock
- TextBox
- TreeView
Other Features
I’m not going to go into every feature present (more posts to come), but here are some teasers:
- Context Menus

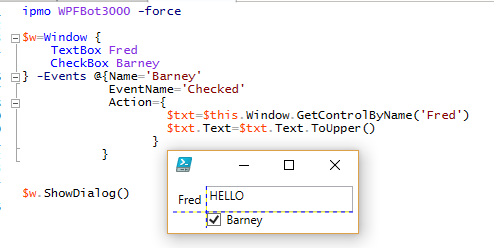
- Event Handlers

- Changing Properties (but not attached or derived properties yet)

That’s enough for tonight, but I’ll be posting more in the days and weeks to come.
Let me know what you think. Feel free to post
Pingback: Introducing WPFBot3000 - PowerShell Station - How to Code .NET
Great idea for a quick use dialog, I can see this would be useful for small tasks, where you want a simple and quick to setup solution.
Pingback: Dew Drop - July 6, 2018 (#2760) - Morning Dew
That’s definitely the point. Trying to make it flexible so you can build something slightly more complex, though.
Great article! Just looking at your upcoming idea for event handling, thought it would be more fluid and consistent to use something like…
“`powershell
$w = Window {
TextBox Fred
CheckBox Barney | Handle Checked {
// Whatever your
// handler code is
}
}
“`
This was a great suggestion. Look at 0.9.23 in the gallery.
I called it HandlesEvent, but otherwise it’s just like your suggestion.