August Missouri User Group Update

It’s been a while since I last sent an update on Missouri user groups.  I missed the June meetings in St. Louis (Michael Greene talking about the release pipeline) and in Columbia (Josh Rickard talking about his anti-phishing toolkit).

In July, Mike Lombardi shared about setting up a private PowerShell Gallery at the STLPSUG meeting. At the July MidMo meeting in Columbia I spoke about validating connectivity in a firewalled environment and Josh Rickard talked briefly about DSC.

I followed up in Columbia a couple of weeks ago with a more in-depth DSC discussion and had a great time.

In a couple of days I’ll be in St. Louis talking about proxy functions and Michael Greene will be sharing as well.

I’m also starting a user group at work and in the initial steps of starting one closer to home.

It’s exciting to see all of this activity and enthusiasm in the Missouri PowerShell community.  We just need someone in the Kansas City area to get things going up north.

–Mike

Re-Learning

The Importance of Learning What You Already Know

A couple of months ago I went to a PowerShell user group meeting on a subject that I already knew really well.  Since it involved a 3-hour drive (one-way) I almost decided not to go.  I had a great time, though, and I thought I’d share some observations I made about the experience.

Starting with the conclusion:  don’t skip out on something (a book, a blog post, a meeting, a video, etc.) just because you’re familiar with the subject.

Now for the reasons:

You might not know it as well as you thought!

First, you might not understand the material as well as you thought.  You probably haven’t used every feature of everything that the speaker is talking about.  Reading an overview in a book (how I’ve learned a lot of stuff) is not nearly as useful as seeing someone demonstrate in front of you. The user group meeting I referred to earlier was about functions, which I’ve used extensively, written about, and taught dozens of times.  I had read about the HelpMessage parameter attribute.  I don’t use it, though, and somehow I had gotten the wrong impression about how it worked.  Interestingly enough, someone else at the meeting thought it worked the same way I did.  We were both wrong.

You might have different opinions than the presenter!

A presentation will usually include some material that is opinion-based.  The simple matter of selecting topics to include conveys an opinion of what is important and what isn’t, for instance.  Trying to determine the opinion of the presenter can provide an opportunity for rich discussion.  If your opinion is different, politely asking why they think that way instead of the way you think can lead to some really good learning opportunities.  Again, in the case of this meeting, it was the Position parameter attribute.  I see it used all the time, and I generally think it’s overused.  The presenter had a different opinion and the ensuing discussion changed my mind.  I’m planning on writing the topic up as a post, so I won’t expand on it more here.   The point is that there’s more to the talk than the bullet points, and the “space between” can often be as educational as the explicit material.

Fine-tuning your understanding

Even if you do understand the “big picture” of the subject, there’s bound to be an angle you hadn’t thought of.  Listening to material that you generally understand gives you the freedom to pay attention to the details that you might miss if you’re trying to get a general understanding.   So, since I wasn’t worried about not grokking the material, I could pay attention to how the speaker was using functions, his naming conventions, etc.  Nuances that I might have missed as a first-time learner were readily available to me.

Encouraging sharing

The previous points were selfish, that is, they were direct benefits for you.  This point is more about being beneficial to the speaker and the community in general.  It’s not nearly as much fun or rewarding to speak to a really small crowd, especially if you’ve spent a lot of time developing and organizing the material.  By just showing up, you’ve encouraged someone who might be making the decision if it’s worthwhile to share or not.

–Mike

SQLPSX Update

Ok. I finally pulled the trigger on a major update (structurally, at least) to SQLSPX. This is the first big change in about 5 years. If you missed the post from a couple of weeks ago warning about this you might want to go back and read it.

In short, SQLPSX hadn’t been updated in a long time. The main downfall (besides not incorporating new SQLServer features) of that delay was that SQLPSX was still trying to load very old SMO DLLs. In the meantime, the SQL Client tools team released an updated PowerShell module for SQL Server as part of the SSMS July 2016 update named SQLServer, which was the name of one of the modules in SQLPSX. So, it was time to do something.

I could have simply renamed the module (and the two functions in it) that collided with the official MS module.  I’ve done that, but I also made some other changes which I’ll explain now.

Some new content

As I mentioned before, Patrick Keisler contributed some code for dealing with mirroring, Central Management Servers, and updated the code to try to load updated SMO assemblies.

The SQLServer module is now called SQLPSXServer

I didn’t want to change the name much.  I also renamed Get-SQLDatabase and Get-SQLErrorLog to Get-SQLPSXDatabase and Get-SQLPSXErrorLog to avoid name collisions with the MS SQLServer module.  I do check to see if the original functions exist, and if they don’t I create aliases so you can use the old names if you don’t load the SQLServer module.

The SQLPSX installer is gone.

In the early days of PowerShell, an installer made a lot more sense.  People didn’t exactly know where to put things, what needed to be run, should we modify the profile…lots of questions.  The community is a lot more comfortable with modules now, so I don’t think an installer is a benefit to the project.  It also slows the project down because we need to create a “build” of the installer with new code.  Since modules are xcopy installable, there’s little benefit in my opinion to having to do a bunch of work every time we make a small change to the code.

The SQLPSX “super-module” is gone.

If you’ve used SQLPSX before, you might remember that there was a “parent” module which loaded all of the other modules, whether you wanted them loaded or not.  Particularly gross (to me, though I see the idea) is that it looked to see if you had Oracle DAC installed, and imported the Oracle tools as well.  And the ISE toools if you were in the ISE.  In my opinion, the community is comfortable enough with modules that simply having a set of modules that you load when you want makes more sense to me.  There’s very little overlap between the modules, so it’s likely that you will use them one at a time anyway.

The Oracle, MySQL and ISE Tools are gone.

This one might make people mad, though I hope not.  First of all, the ISE tools worked fine in 2.0, but not so much after that.  I haven’t had time (or interest, to be honest) to look at them, but I also didn’t find using the ISE as a SQL Editor to be a great experience.  If you want to grab the module(s) for ISE and update them, more power to you!

The Oracle and MySQL tools were always kind of fun to me.  They started out as cut/paste from adolib (the ADO.NET wrapper in SQLPSX), replacing the SQLServer data provider with the Oracle and MySQL provider.  Some extra work was done in them, and I don’t want to disparage that work.  But at the outset, SQLPSX is a SQLServer-based set of modules.  If you want to take OracleClient and run with it, that’s awesome and I hope it helps you.  Let me know, because I’ll probably end up using it myself at some point.

Some of the “odd” modules are gone

There were a few modules that didn’t really fit the SQLServer theme (WPK…copy of a WPF toolkit distributed by Microsoft, PerfCounters).  I’ve removed them from the main modules list as well.

TestScripts, Libraries, and Documentation are gone

The TestScripts were very out of date, I’m not sure how the libraries were used, and the documentation was old documentation for a single module.

Gone doesn’t really mean gone.

There’s a Deprecated folder with all of this stuff in it, so when we find something that I broke by removing it, we can put it back.

This isn’t quite a release yet.

So first of all, I haven’t changed code in most of the modules, so if they don’t work, they probably didn’t to start with.  If you find something that’s broken (or you think might be broken), please add an issue to the project on GitHub or if you feel comfortable with the code, send a pull request with a fix.  I have done some simple testing with adolib (which really is my only code contribution to the project) and SQLPSXServer (which I renamed).  Other than that, it’s open season.  I’ll probably let this bake for a few weeks before I start updating version numbers in module manifests.

If you have questions about what’s going on or why I made the changes I did, feel free to reach out to me.  If you want to help with the project in any capacity, I’d love to hear from you.

Hopefully I didn’t step on too many toes.  If yours were stepped on, I apologize.  Let me know what I did and I’ll try to make it right.  The community works better if it communicates.

–Mike

You don’t need semicolons in multi-line hashtable literals.

This is not a world-changing topic, but I thought it was worth sharing.

If you have written hashtable literals on a single line, you’ve seen this before:

$hash=@{Name='Mike';Blog='powershellstation-a07ac6.ingress-erytho.easywp.com'}

Sometimes, it makes more sense to write the hashtable over several lines, especially if it has several items. I’ve always written them like this:

$hash=@{Name='Mike';
        Blog='powershellstation-a07ac6.ingress-erytho.easywp.com';
        Language='PowerShell'
}

I was watching Don Jones’ toolmaking sessions on youtube and what he did was slightly different.

$hash=@{Name='Mike'
        Blog='powershellstation-a07ac6.ingress-erytho.easywp.com'
        Language='PowerShell'
}

I watched and waited for him to get errors, but he’s Don, so he got it right.

I’m not sure how I missed this, but you don’t need semicolons in multi-line hashtable literals.

–Mike

The future of SQLPSX

With the recent seismic shift in the SQL PowerShell tools landscape, I thought it would be a good idea to address the state and future of the SQLPSX project.

First of all, SQLPSX is not going away. There will always be some functions or scripts that don’t make it into the official modules installed with SQL Server. I’m very excited to see the first sets of changes to the official SQL client tools and the energy in both the community and the MS Team is very exciting. On the other hand, SQLPSX has been around for a long time and some people have grown accustomed to using it.

My plans for SQLPSX are the following:

  • Rename the SQLServer module to SQLPSXServer to avoid a conflict with the official SQLServer module
  • Remove the “main” SQLPSX module which loads the sub-modules
  • Move several modules to a “Deprecated” folder (SQLISE, OracleISE, WPK, ISECreamBasic
  • Remove the installer…most people do xcopy installs anymore
  • Edit the codeplex page to point here

There has been some activity on Github lately from a new contributor (Patrick Keisler) who has updated the SMO assembly loading as well as other places assemblies are loaded. He also contributed a module for dealing with mirroring and with a Central Management Server (CMS). I’ve been talking with people on the SQL Server community slack channel about getting some testing done (I don’t have a lot of different SQL Servers sitting around) and hope to have a new release this month. That will be the first real release in about 5 years!

If you want to know how you can get involved in SQLPSX, let me know.

–Mike

Custom objects and PSTypeName

A couple of weeks ago, Adam Bertram wrote a post which got me really excited. As an aside, if you’re not following Adam you’re missing out. He posts ridiculously often and writes high quality posts about all kinds of cool stuff. I’m writing about one such post.

Anyway, his post was about using the PSTypeName property of PSCustomObjects and the PSTypeName() parameter attribute to restrict function parameters based on a “fake” type. By “fake”, I mean that there isn’t necessarily a .NET type with a matching name, and even if there was, these objects aren’t those types. An example might help:

First, by including a special property called PSTypeName in the PSCustomObject, the object “becomes” that type.

$obj=[pscustomobject]@{PSTypeName='Mike';
                       DisplayName='My custom object'}
$obj | Get-Member

PSTypeName1

So now we have an object which thinks it is of type “Mike”.

Using the PSTypeName() parameter attribute, we can create a parameter which only accepts objects of that type!

function Get-DisplayName{
    param([PSTypeName('Mike')]$obj)
    $obj.DisplayName
 }

Calling this function with our object and a string shows that it only accepted our object.

PSTypeNames2

The text of the error is as follows:

Get-DisplayName : Cannot bind argument to parameter ‘obj’, because PSTypeNames of the argument do not match the PSTypeName
required by the parameter: Mike.

It’s probably worth mentioning that we can’t just put [Mike] as the parameter type. PowerShell really wants “real” types in that situation.

So, now we can easily create our own types of objects without dealing with C# or PowerShell classes, and still get the “type” validated in a function parameter….Sweet!

But wait! Back in 2009, I wrote about modifying objects in order to get special formatting or special new members from PS1XML files, through PowerShell’s awesome Extended Type System. I did that by looking at the PSObject underlying the object (all objects in PowerShell do this), and inserting a value into the PSTypeNames array.

It turns out that the PSTypeName() parameter attribute recognizes objects that are “customized” this way as well:

$obj2=get-service | select-object -first 1
$obj2.PSOBject.TypeNames.Insert(0,'MIKE')
$obj2 | Get-Member

PSTypeNames3

Now that we have the object (which is really a ServiceController object, but we told it to pretend to be a Mike), let’s try it in the Get-DisplayName function we wrote above:
PSTypeNames4

So, we can use the PSTypeNames() parameter attribute for any object which has had its PSTypeNames() fiddled with. That’s great for me, because I get a lot of objects from a database, so they’re really DataRow objects. I add an entry to PSTypeNames to help represent what kind of objects they came from (e.g. what table or query they came from) but until I found out about this I was stuck using ValidateScript() to check parameters.

What do you think? Is this something you can see a use for?

Let me know in the comments or on social media.

–Mike

P.S. Adam says that Kirk Munro was the original source of this information. He’s awesome too, so I’m not really surprised.
P.P.S…Kirk commented below that Oisín Grehan and Jason Shirk were his sources in this. Great teamwork in the PowerShell community!

Translating Visio VBA to PowerShell

In working on VisioBot3000, I’ve spent a lot of time looking at VBA in Visio’s macro editor. It’s one of the easiest ways to find out how things work. I thought it would be fun to take some VBA and convert it to PowerShell to demonstrate the process.

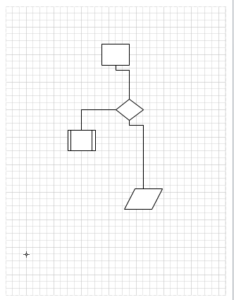
We’ll start with a basic diagram using flowchart shapes and normal connectors. It doesn’t really matter what is on the diagram, though, because we’re just using it to make Visio tell us how to do things.

Here’s my diagram:
VBAExample

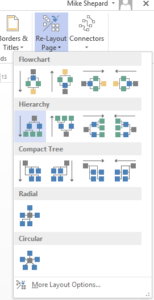
As our first “translation” exercise, let’s try setting the page layout to “circular”. To do that in the app, we’ll go to the Design tab, select the Re-Layout Page dropdown, and select Circular.

Before we do that, though, let’s turn on macro recording. The easiest way to do that is to click the icon on the status bar:
MacroRecorder

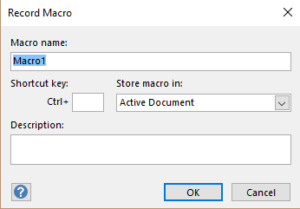
When we do that, a dialog will pop up asking you what to name the new macro. It doesn’t matter, just remember what name you use (or leave it alone) because we’re going to look at the macro to see what’s going on. I named mine circular after I took this screenshot:
NameTheMacro
After you click ok, select the menu item you wanted (Design/Re-Layout Page/Circular).
Circular
When you did that, it applied the new layout to the page, just as expected. Now, click the “stop” button on the status bar (which replaced the “record a macro” button on the status bar) to stop recording.
StopRecording
Now, you want to look at the macro, and to do that you need to go to the developer tab on the ribbon. If you don’t have a developer tab, you need to go to the file tab, select Options, Advanced, and under General, select “Run in Developer Mode”.
DeveloperMode

Whew…that’s a lot of work just to get a macro recorded. Next time it will be easier since you know how to do it.

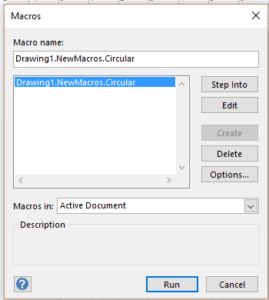
Let’s look at the macro. On the developer tab, click the macros button, bringing up the list of macros that have been recorded in this document, and select the macro you just recorded. Click the Edit button to see the source.
ListOfMacros

Here’s what Visio recorded when we made that single formatting change:

Sub Circular()

    'Enable diagram services
    Dim DiagramServices As Integer
    DiagramServices = ActiveDocument.DiagramServicesEnabled
    ActiveDocument.DiagramServicesEnabled = visServiceVersion140 + visServiceVersion150

    Dim UndoScopeID1 As Long
    UndoScopeID1 = Application.BeginUndoScope("Lay Out Shapes")
    Application.ActiveWindow.Ptage.PageSheet.CellsSRC(visSectionObject, visRowPageLayout, visPLOPlaceStyle).FormulaForceU = "6"
    Application.ActiveWindow.Page.PageSheet.CellsSRC(visSectionObject, visRowPageLayout, visPLORouteStyle).FormulaForceU = "16"
    Application.ActiveWindow.Page.Layout
    Application.EndUndoScope UndoScopeID1, True

    'Restore diagram services
    ActiveDocument.DiagramServicesEnabled = DiagramServices

End Sub

I see the following basic steps:

  1. Save the current DiagramServicesEnabled setting (line 4-5)
  2. Set the DiagramServicesEnabled property to a new value (line 6)
  3. Set a checkpoint for “undo” (line 9)
  4. Do the layout that we asked for (line 10-12)
  5. End the “undo” checkpoint (line 13)
  6. Put the DiagramServicesEnabled property back how we found it (line 16)

The DiagramServicesEnabled property belongs to a document, so in our code we could use the Get-VisioDocument cmdlet to get the current one. The reference page on that property has a handy list of values for the different levels of diagram services (we need visServiceVersion140 and visServiceVersion150, which are 7 and 8, respectively).

It’s completely up to you if you want to provide the ability to undo operations. I haven’t included this “feature” in VisioBot3000, but it seems like it would be pretty easy.

The actual layout operation uses the current page, so now we could use Get-VisioPage to get the current page as an object. There are 2 calls to CellSRC (which stands for Section, Row, Column, btw) with a bunch of constants.
There are 2 different ways to handle these:
First, you can google the constants and replicate the lines verbatim (yuck). That works, but leaves the code full of “magic numbers”.
Alternatively, you can look at the last constant (visPLOPlaceStyle, visPLORouteStyle) and google them. Let’s look at the first (visPLOPlaceStyle). One of the first links is to the VisCellIndices page here. You probably want to bookmark that page if you’re dealing with the Visio API. You will use it all the time. Anyway, searching on the page for visPLOPlaceStyle tells you that this is the “PlaceStyle” cell. That means you can replace that huge call with:
$Page.Cells(‘PlaceStyle’)=6. You don’t really need the formula to set it, but if you want you can do $Page.Cells(‘PlaceStyle’).Formula=’=6′. Since it’s just a number (with no units), this works fine.

Similarly, the other CellSRC call can be replaced by $Page.Cells(‘RouteStyle’)=16.

Putting all of that together into a function with VisioBot3000 looks like this:

Import-Module VisioBot3000

function Set-VisioCircularLayout{
    
    $Visio=Get-VisioApplication

    $document=Get-VisioDocument    
    #or $document=$Visio.ActiveDocument

    #save the document setting
    $SaveSetting=$document.DiagramServicesEnabled
    $document.DiagramServicesEnabled=(7+8)

    $UndoScope=$Visio.BeginUndoScope("Lay Out Shapes")

    $page=Get-VisioPage

    #Make the layout change
    $Page.Cells('PlaceStyle')=6
    $Page.Cells('RouteStyle')=16

    $Page.Layout()


    $Visio.EndUndoScope($UndoScope,1)

    #put the setting back
    $document.DiagramServicesEnabled=$SaveSetting
}

Hope that made sense. Next time I’ll talk about how I deal with all of the Visio constants.

–Mike

More PowerShell User Group Fun

Been neglecting writing up my Missouri user group adventures.

Last month (4/21) we had a several-hour talk session at the STL PSUG. Met @migreene and had a great time.

Last week (5/5…probably not the best day to meet) I presented a talk on Advanced Functions to a small but fun group at the MidMo PowerShell.

Tuesday I sat in on the @MSPSUG meeting with Steven Murawski.

I’ve started the ball rolling on a Southwest Missouri PSUG…probably have a meeting in June.

I really love the PowerShell community and enjoy all of the interaction.

–Mike

Assignments in PowerShell If Statements

You probably learned early on in your PowerShell experience that -eq and = were very different things.

I still occasionally write

if($x=5)

when I mean to write

if($x -eq 5)

The first will always evaluate to $true, which is generally not what you want.

One trick I’ve seen before is to put the constant (if there is one) on the left-hand side, which causes the assignment to fail with an error, alerting you to the fact that you did something wrong:

if(5 -eq $x)
or 
if(5=$x)

I don’t know if I would be able to even type the second without seeing the problem. Anyway, the point of this post isn’t that you shouldn’t use = in an if statement, but a useful situation where you might consider using it.

As a scenario, consider looking for services that are set to automatically start, but are currently stopped. I know I’ve done that before. What if you wanted to write the list of services meeting that criteria to a log file, but only if there were some that matched.

You might do something like this:

$services=get-ciminstance win32_service -filter "StartMode='Automatic' and State='Stopped'"
if($services){
   $Services | out-csv c:\temp\StoppedServices.csv
}

Putting the assignment in the if statement saves you a line:

if($services=get-ciminstance win32_service -filter "StartMode='Automatic' and State='Stopped'"){
   $Services | out-csv c:\temp\StoppedServices.csv
}

The value of the assignment statement is the value of the right-hand side. If there aren’t any services, the condition is false and we don’t try to write an empty file.

This isn’t a world-changer, but it might come in handy.

What do you think?

–Mike

Introducing VisioBot3000 – Part 2 (Superman?)

In the last post I showed you how VisioBot3000 makes drawing simple Visio diagrams simpler by wrapping the Visio COM API and providing more straight-forward cmdlets do refer to stencils and masters, and to draw shapes, containers, and connectors on the page.

To be honest, that’s where I was expecting to end up when I started messing with Visio.  And I was ok with that.  Anything which simplifies drawing Visio diagrams is a win in my book.  I learned quite a bit getting that far, and it works pretty well.

I decided that I wanted more, though.  I’ll explain the “improvements” in steps.  Because I want to you to see the improvements, I’ll start with the sample code from the last post:

Import-Module VisioBot3000 -Force

#start Visio and create a new document
New-VisioApplication
New-VisioDocument C:\temp\TestVisioPrimitives.vsdx 

#tell Visio what Stencils I want to use and give them "nicknames"
Register-VisioStencil -Name Containers -Path C:\temp\MyContainers.vssx 
Register-VisioStencil -Name Servers -Path C:\temp\SERVER_U.vssx

#pick a master from one of those stencils and give it a nickname
Register-VisioShape -Name WebServer -From Servers -MasterName 'Web Server'
Register-VisioShape -Name DBServer -From Servers -MasterName 'Database Server'


#pick another master (this time a container) and give it a nickname
#note that this is a different cmdlet
Register-VisioContainer -Name Domain -From Containers -MasterName 'Domain'

#draw a container with two items in it
New-VisioContainer -shape (get-visioshape Domain) -name MyDomain -contents {
   New-VisioShape -master WebServer -name PrimaryServer -x 5 -y 5
   New-VisioShape -master DBServer -Name SQL01 -x 5 -y 7
}

#add a connector
New-VisioConnector -from PrimaryServer -to SQL01 -name SQL -color Red -Arrow

Aliases

An easy “facelift” is achieved by adding a few strategic aliases. Before you yell at me for using aliases in a script, I am viewing these “diagram scripts” as something a bit different from normal PowerShell scripts.

Anyway, the aliases make registering shapes, stencils, and containers much simpler.

Import-Module VisioBot3000 -Force

#start Visio and create a new document
New-VisioApplication
Diagram C:\temp\TestVisioPrimitives.vsdx 

#tell Visio what Stencils I want to use and give them "nicknames"
Stencil Containers -Path C:\temp\MyContainers.vssx 
Stencil Servers -Path C:\temp\SERVER_U.vssx

#pick a master from one of those stencils and give it a nickname
Shape -Name WebServer -From Servers -MasterName 'Web Server'
Shape -Name DBServer -From Servers -MasterName 'Database Server'

#pick another master (this time a container) and give it a nickname
#note that this is a different cmdlet
Container -name Domain -From Containers -MasterName 'Domain'

#draw a container with two items in it
New-VisioContainer -shape (get-visioshape Domain) -label MyDomain -contents {
   New-VisioShape -master WebServer -label PrimaryServer -x 5 -y 5
   New-VisioShape -master DBServer -label SQL01 -x 5 -y 7
}

#add a connector
New-VisioConnector -from PrimaryServer -to SQL01 -label SQL -color Red -Arrow

Positioning

Ok…I really hate specifying positions for the shapes I want on the page. Because of that, I include a very simple relative positioning algorithm in VisioBot3000. By default, VisioBot3000 places shapes in a single, horizontal line. That is, if you don’t tell it where to put a shape, it puts it just to the right of the last shape that it drew. If you want, you can tell it to draw in columns (rather than rows) by using Set-RelativePositionDirection cmdlet.

So I can simplify the “diagram” portion of the sample to be this. Note that the output isn’t quite the same, but the shapes are there and connected, so I’m still happy.:

#draw a container with two items in it
New-VisioContainer -shape (get-visioshape Domain) -label MyDomain -contents {
   Set-NextShapePosition -x 5 -y 5
   New-VisioShape -master WebServer -label PrimaryServer  
   New-VisioShape -master DBServer -label SQL01  
}

A couple of important points to note. First, if you haven’t placed any shapes yet, VisioBot will place the next shape at the top-left of the page. If you want to have it start somewhere else, you can pass coordinates to the Set-NextShapePosition cmdlet (as I did in the example).

Second, the next shape is relative to the position of the previous shape, not the place the shape was dropped. If you’re drawing the diagram hands-off, then there’s no difference. If you put a breakpoint (or are just “drawing” from the command-line), you can move the last shape before the next shape is drawn, and the next shape will be positioned relative to the new position rather than where it was originally placed. This allows you to “guide” the drawing in order to make it a bit more beautiful (as if that’s possible).

And now, the main attraction…a custom DSL

The sample code is pretty logical, in that you can easily see what’s going on, and it’s obvious which PowerShell cmdlets are being called to do certain things in the drawing of the diagram.

Unfortunately, the “high visibility” of the PowerShell in the diagram code obscures the “diagram description” in the code. Wouldn’t it be nice if you could just say this?:

Domain MyDomain {
   WebServer PrimaryServer
   DBServer SQL01
}

Isn’t that a much clearer “diagram description”? Of course it is. And the awesome thing is that the code above is perfectly valid PowerShell (and does exactly what the previous example did, except for the position).

How is that possible? Whenever you register a shape or container (or connector, but we didn’t do that), VisioBot3000 creates a function with the same name as what you register. So, when we executed “Register-VisioContainer -Name Domain …”, VisioBot3000 created a function called Domain which has the same parameters as New-VisioContainer (except for the shape, which is the Domain shape). Similarly, “Register-VisioShape -Name WebServer…” created a function called WebServer that lets you draw WebServers without using PowerShell-looking code.

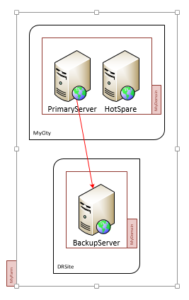
Here’s a bigger example, along with the output. (I’ll leave out the stencil and shape definitions. You can find the whole script here):

Set-NextShapePosition -x 3.5 -y 7
Logical MyFarm {
    Location MyCity {
        Domain MyDomain  {
            WebServer PrimaryServer
            WebServer HotSpare

        }
    }
    Location DRSite {
        Domain MyDomain -name SiteB_MyDomain {
            Set-RelativePositionDirection Vertical
		    WebServer BackupServer 

	    }
    }
}
SQL -From PrimaryServer -To BackupServer
VisioBodDSL3

A quick note. All of my examples have been with servers, domains, etc. There’s nothing in VisioBot3000 that has anything to do with those. It’s just the topic of my diagrams. You could just as easily have a diagram with divisions, departments, and teams, showing directors, managers, team leaders and team members. The DSL for your diagrams would include those terms, possibly like this:

Division IT {
    Director "IT Director Name"
    Department HelpDesk {
           Manager "HD Manager Name" 
           Team FirstLineSupport {
                TeamLead "FirstLine Team Lead Name"
                Member "Member 1"
                Member "Member 2"
           }
}

So the “diagram description” or DSL is completely defined by the stencils and shapes you choose.

I think that’s amazing. And guess what? There’s a lot more. I’ll be blogging this week about other features in VisioBot3000 and plans I have. If you have ideas, I’d love to hear them.

It’s all still under active development (just me at this point, but if you want to jump in I’d be glad to share the load).

Let me know what you think!

–Mike